
Got to my scoot yesterday, chained to the lamppost opposite my house, to find that the weatherproof cover had pools of neat fuel hanging down like incendiary saddle bags. The bike had also moved. And what's this? The side panel was loose, and the front mudguard was dented and hanging off.
Conclusion - some arse knocked it over while parking. I suspect it was a van as the mudguard dent is too high and square for it be a car. I guess they (or somebody else) picked it up, which is a relief as it would have just lay there leaking fuel.
The stand has also bent which means when I kick start the lever hits the floor. Total damage, if I were to get it done properly, runs into hundreds.
Looks like my decision to 'keep it shabby' has paid off. I'll bend the mudguard back, and re-attach it as it's dangerously loose. Not sure about the stand though, that might need a little more work :(
I guess I'm lucky there's no snapped levers, broken lights etc.
Tuesday 15 December 2009
Sunday 29 November 2009
mylicenceplate.co.uk - very poor indeed
I know there was somebody there at mylicenceplate for the following reasons:
- they took my money
- I have their fingerprints permanently on my number plate
This came somewhat as a surprise to me because I'd actually decided that they must have gone out of business. I thought this because a few weeks ago I was trying to contact them about said fingerprints. And here they are:

Nice huh? These prominent and indelible marks passed their non-existent quality control and actually got sent to me.
So I emailed them a polite email informing them of my problem, with this picture attached. No reply. I emailed them again. No reply. I emailed another email address. No reply.
Then I phoned. No answer. I phoned another number. No answer. And another number. No answer. And then I phoned them all again on a different day just to make sure. No answer.
Then I used their contact form on the website. No reply.
So, after using their website, and after three unanswered emails to two different addresses, and six unanswered phonecalls to 3 different numbers, all over a period of about 3 weeks, I decided they must have gone out of business. Well they haven't, as last week they sent me a marketing email. It's now clear they just don't care.
My advice? Whether you're looking for number plates, decals, stripes, sunstrips, graphics, then go somewhere else. If you buy from mylicenceplate.co.uk you'll be met with a wall of silence if you need any help.
Friday 11 September 2009
Lambrettas everywhere
A Friday off work and it's a beautiful September day, so it was high time I took the scoot for a fast run up the Long Ashton bypass to check that everything is working as it should be. I had to fill her up with fuel first and here's where I made a mistake. I expected to be putting in 6 litres of fuel so I dropped in 250ml of oil prior to filling. Unfortunately the tank was full after 5 litres, so I'd miscalculated, and now had an incorrect fuel/oil mix of nearly 5%. I figured this shouldn't matter too much so carried on with my ride.
I sped along the bypass and it ran really well, keeping up with the traffic probably at around 55 or 60mph, although with my kph speedo and non-standard tyres it's difficult to tell.
But then, pulling off at the first junction the engine died while coasting, so I bailed out to the central reservation and started poking around. Compression was ok, and everything sounded ok, but it wouldn't start. The only tools I'd bought with me were some pliers, crimpers, meter and screwdriver - I was planning only to tweak the erratic rear light!
I'd been there 3 mins max when out of the blue a chap called Geoff pulled up on his S3 to lend a hand.

He had a spark plug spanner, so we removed the plug, gave it a wipe, cranked the engine a few times with no plug, and then refitted it. Geoff had the honour of trying to restart it - and start it did, with Geoff's 'full throttle' technique. Although I did have to increase the idle speed to keep it going, and my theory is that my problems were down to the fuel mix. Thanks to Geoff who turned up at just the right time!
Geoff went on his way and just as I was about leave, another Lambretta rider turns up. This time it's a chap called Ian:

It turns out he lives just down the road from Geoff, but they don't know each other. Ian was tentatively running in his GP and had only a few weeks ago suffered a seizure on this same stretch of road.
So if you want to meet other Lambretta riders, break down on the Long Ashton bypass on a sunny Friday morning. From now on I'll be carrying 200ml of oil for a 4.8 litre fill-up, giving me my target 4% ratio.
Tuesday 8 September 2009
Jetex carb air mixture screw

The setting for the Jetex air mixture screw is different to that of a Dell'orto, so don't blindly follow advice for the wrong carb. For a Dellorto SH carb we are told to start off about 1 ½ turns and go from there. For a Jetex however, there's a label on the side that clearly states we shouldn't be going more than ¾ turns out.
To set the mixture properly, first warm up your engine. Then set the throttle idle screw (no. 26 in the diagram above) so that it holds the throttle open with the engine slightly fast. Now we need to set the mixture screw (no. 13) so that the engine is smooth and regular. Turning the screw in will make the mixture leaner, and out will richen it. When you have the smoothest tickover try opening the throttle. If the engine splutters or stops then a little more adjustment, probably to make it richer, is needed to eliminate this.
You'll probably end up somewhere between ½ and ¾ turns out.
Saturday 22 August 2009
Making a Lambretta exhaust quieter
I have a KBA exhaust, and it's pretty noisy. I have a theory that disrupting the air-flow near the exit point, and making it more turbulent, might reduce the 'pop' which is I think is the source of a lot of the noise. I also reckon this will have no impact on performance.
Now this is just an experiment at this stage, but I've dropped a discreet pop-rivet into the end of the exhaust to create the turbulence. I'll let you know a later date if it seems to have worked or not!

If it doesn't work then I'll have experiment with a baffle of some sort.
Now this is just an experiment at this stage, but I've dropped a discreet pop-rivet into the end of the exhaust to create the turbulence. I'll let you know a later date if it seems to have worked or not!

If it doesn't work then I'll have experiment with a baffle of some sort.
Gear oil change
While it was off the road I though it might be a good time to drain and change the gear oil. This hasn't done many miles but I was keen to see if I was getting any fuel contamination (indicating a leak via the drive-side bearing) or there was any alarming debris in there. I was relieved to see and smell everything was normal.

My oil-draining technique is a funnel and a plastic milk carton.

My oil-draining technique is a funnel and a plastic milk carton.
Lost compression
After about 50km of gentle commuting over a couple of weeks I noticed that the Lambretta had become difficult to start, and I'd had to adjust the idle setting and the mixture screw quite a few times in trying to get it all to work properly. So yesterday I decided to have poke around to see what was wrong.
My suspicion was aroused by what looked like oil on the fins where the head meets the cylinder. A check underneath revealed oil dripping from this area; this was pointing to a leak around the head gasket. So I did a compression test, and got a reading of 70psi. But what should it be?
Don't you remember Boyle's Law that tells us at a constant temperature 'PV = constant' where 'P is pressure and V is volume? So if you're compression ratio is supposed to be 7:1, then you're decreasing the volume of the gas in your cylinder (at atmospheric pressure, say 14.7psi) by a multiple of 7, which means the pressure reading at TDC should be a multiple of 7 higher than atmospheric, about 100psi.
Clearly I had a problem, and no wonder I was having to bump start the thing every day.

So I decided to remove the head and cyclinder with the engine almost in situ. By placing a trolley jack beneath it and removing the exhaust, inlet manifold and carb (just leave it dangling on the air hose), and then the engine bar you can lower the engine just enough to completely remove the top end. This is without having to undo any cables or wires, and I managed to leave my footboards in situ too (althoug I don't have a precious paint job!). Here's a pic of the oily fins after I removed the cowl. You can see all the others are clean but the top of the cylinder is clearly more oily:

Alarmingly, ny head nuts didn't offer much resistance when undoing, and although the head gasket wasn't damaged the cylinder base gasket had virtually disappeared:

I've no idea why my head nuts were loose. They either worked themselves loose (and I did notice that my wavy washers weren't very wavy at all), or perhaps I forgot to torque them up properly? I guess I'll never know, but when rebuilding it I cleaned all my gasket faces and this time used some sealant on the new base gasket but left the head gasket dry. I also made my wavy head nut washers more wavy in an effort to keep them tight.
After a long morning's work it was finished and back together, and to my amazement it started on the first kick! Time to take it out and do some plug chops.
With hindsight there was another symptom that should have alerted me to this problem earlier, but I'd simply made a mental note to 'keep an eye on it' - that was I seemed to get through a tank of fuel a lot quicker than I should have. Now I know why!
Note to self: Always have a spare set of gaskets for last-minute rebuilds.
Sunday 16 August 2009
Throttle return spring
The throttle handle on Lambrettas is returned to its stationary position by the slide return spring in the carb. In my opinion this is a big ask, and this became a problem when I fitted my new light switch. The cables for the switch were chunkier than the one I replaced, and I couldn't stop them interfering with the rotation of the throttle handle. It wasn't noticeable other than the throttle not returning when letting go, meaning a hairy moment when I forgot this on my first ride with the new switch.
To overcome this I fitted a spring from the end of the junction block to a nail inserted into the pin holding the nylon throttle wheel in place. The picture below shows the new switch wires and the spring in the foreground.

Not pretty to look at, but it works a treat, giving that extra bit of help to bring the throttle back to the closed position.
Monday 10 August 2009
Adjusting the speedo cable
I never found the time to make the speedo work prior to my MOT, but this was ok as rather surprisingly you don't need one.
When I finally got the time to look at it it was apparent that the square-ended inner cable wasn't quite reaching home at the wheel-hub end. This was easily fixed by removing some of the plastic outer casing and winding the olive 5mm further along the cable.
When I finally got the time to look at it it was apparent that the square-ended inner cable wasn't quite reaching home at the wheel-hub end. This was easily fixed by removing some of the plastic outer casing and winding the olive 5mm further along the cable.
Saturday 4 July 2009
Breakdown
Went for my MOT re-test today. Arrived well on time only to be told that I need to bring along my failure sheet. "Surely its on your system?" I asked. Apparently not. What a stupid system.
So I rushed back home to pick it up, but had a breakdown on the way back - the sound of scraping metal and then the engine stalling. This didn't sound good at all - I tried a light kick on the kick start and heard the same noise, and stopped straight away. So I pushed the scoot back home.
On closer inspection at home it turned out the flywheel cowl had come loose and was resting on the flywheel - what a relief! There was me thinking I'd holed the piston or lost a piston ring or something similar. So £2 on a set of new cowling fixings, but back to square one with the MOT.
Wrong rear brake cam
Here's the reason I couldn't get the rear brake set up right:
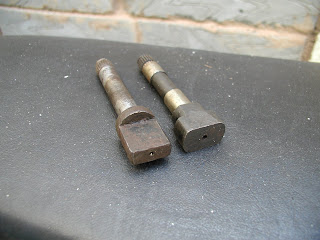
On the left is a rear brake cam from a GP, on the right one for an LI. It seems my LI had a GP cam fitted (and presumably the old shoes I threw out were GP too) but I fitted new LI shoes (as you would, on an LI). This resulted in the available brake pedal travel not being enough to apply the brakes fully.
Sorted now.
Sunday 28 June 2009
First ride
The good news is it starts from cold on the second kick, and runs sweet as a nut! The bad news is it failed the MOT on my (not-so-clever) horn and the rear brake - too much travel in the pedal, and not enough braking. This had been a pain to set up and I left it in what I thought was a sufficient state, but obviously not.
To be investigated. Re-test booked for next Saturday.

To be investigated. Re-test booked for next Saturday.

Friday 26 June 2009
Light switch
So I'm ready for the MOT tomorrow, but at the last minute I noticed that the dipped beam wasn't working, only full beam. I checked the wires to the back of the bulb and everything was in place. I then partially removed the switch and found that if I jiggled it around a bit the lights would work, and then not work.
Dismantling the switch revealed some rather poor quality workmanship - more like a GCSE electronics project than a commercial automotive part. The dismantling process indeed revealed the problem (see later), but rendered the switch useless. I went round the corner to Fanatic to get a new one, armed with a multimeter to ensure I got a working one.
Now there is definitely a technique to getting the switch cable in through the throttle housing - remove the tough plastic sheathing so that the individual wires are loose and exposed enough to be fed through one by one and captured at the other side. I'd say its about 100mm or so. Then feed each wire through one by one, and when they're all through a combination of pulling from one end and pushing with a blunt instrument at the other end should get your wires through. Make sure when you're done the bulk of it sits in the recess to the front of the housing. Test your throttle, and if there's too much resistance from your light wiring then jiggle it around a bit more or even try some WD40.
So after fitting my new switch I had the same problem all over again - some settings work, some don't. But armed with some prior knowledge I now knew how to overcome this. With the switch fully fitted take each individual wire where it appears from the sheath and pull it hard. This pulls the wire within the switch housing so that it sits squarely back into its correct position where it should be soldered, but often isn't.
Problem fixed. Ready for MOT. Note to self: buy a better quality switch soon. :)
Tuesday 23 June 2009
Locking it up
The best you can do to keep your Lambretta where you left it is to lock it to something immovable with something impenetrable.
The something immovable bit is easy and obvious - lamppost, roadsign etc. The something impenetrable bit is a bit less obvious. The world of motorcycle security chains is peppered with marketing bull**** that is misleading at best. "Crop-resistant" is my favourite. It means absolutely nothing, and if you search on youtube it won't take you long to find videos of big-brand "crop-resistant" chains being cropped by hand with a pair of 42" Records.
A bit more research and you will find some smaller names producing some serious hardware that they guarantee is uncroppable, along with the youtube vids to prove it. Almax in particular are good at this kind of promotion, and you will find them mentioned on quite a few forums. However, I bought a 16mm Pragmasis Protector (www.torc-anchors.com), and my word it's a beast. It weighs a ton and as expected it isn't one for carrying to the shops with you. It is however the perfect chain for using at home and helping you sleep easy.

I have two locks for this chain. The 'Untouchable' is a unique, small, portable design and is available from torc-anchors.com, and The Oxford Boss Disc Lock Alarm is a more traditional padlock-type device with an inbuilt alarm system.
The fitting of a front disc gives you the option to use a disc lock too. The SPAQ/Sterling (same as ScootRS) discs have limited space for a disc lock, but after a bit of trial and error I found that one fits and works well - the Xena XZZ6 Disc Lock Alarm. It's strong, well built, loud, and portable.

I also bought an Oxford Nemesis to back this up - it too fits onto the front disc.
Friday 19 June 2009
Making the horn louder
This Lambretta is going to be used regularly, and almost exclusively around the city. For this reason I wasn't happy with the dull 'quack' of the AC horn which would frankly be useless on anything but the quietest of roads.
I did a bit of googling about how to resolve this, and everything I found referred to fitting a battery; the only way you can get a good horn sound at all revs is by having a DC horn.
I have no intention of fitting a battery, so a bit more googling and some high-school physics led me to try out a bridge rectifier with a DC horn. A rectifier turns AC into DC.
I bought a KBPC35-04, made up some wires with spade connectors, and fitted it with a generic motorcycle 12V DC horn. Here's what it looks like:

And guess what? IT WORKS! Now I have a half-decent horn sound, whatever my engine speed. Clever huh? :)
Update: The MOT inspector didn't seem to like my horn - he thought it was too quiet at higher revs. I can hardly tell the difference.
I did a bit of googling about how to resolve this, and everything I found referred to fitting a battery; the only way you can get a good horn sound at all revs is by having a DC horn.
I have no intention of fitting a battery, so a bit more googling and some high-school physics led me to try out a bridge rectifier with a DC horn. A rectifier turns AC into DC.
I bought a KBPC35-04, made up some wires with spade connectors, and fitted it with a generic motorcycle 12V DC horn. Here's what it looks like:

And guess what? IT WORKS! Now I have a half-decent horn sound, whatever my engine speed. Clever huh? :)
I think I'm going to try a 6v DC horn with it too - apparently running a 6v horn on a 12v system gives you some extra welly.
Update: The MOT inspector didn't seem to like my horn - he thought it was too quiet at higher revs. I can hardly tell the difference.
Cabling and wiring
I have no photos of this phase. I did take some but the card for my digi camera gave up the ghost so they are lost. No problem, as there really isn't much to see. I pretty much followed the routing guides in Sticky's Lambretta manual, and I used strong and long cable ties to mock it all up, then checked everything was working (start up, test lights, brakes etc.) before fitting the aluminium ties.
I did make a rather annoying mistake when fitting the bodywork back on though. I stretched the throttle cable out of place with the legshields, and when I discovered this rather than remove the legshields again (which were a pain to fit as they are a bit mis-shapen in some places) I had to fiddle with the cable in situ beneath the bike.
Fitting the hydraulic disc brake
Fitting the hub was fairly self-explanatory, and the one problem I did have (front wheel not being central in the forks) I posted about previously, and I rectified it by straightening out some wear on one of the fork links. It is worth noting however that these hubs (mine's a SPAQ/Sterling jobby) don't require a nut between the link and the large plate on the right hand side. The hubs don't come with them, but at a recent parts fair I saw some of these hubs with nuts fitted - I guess the stall owner thought they were missing and fitted them!
Here's a pic of the assembly in place:

To connect it all I discarded the rather bulky rubber hose that came with the unit and bought a new slimmer Goodridge braided stainless steel one from http://www.busters-accessories.co.uk/. This is what I got:
Buildaline Adaptor Banjo 90deg 3/8 Jic Male 5.99 1 5.99
Buildaline Adaptor Banjo 45deg 3/8 Jic Male 5.99 1 5.99
S/B Buildaline Hose 1100mm Clear
The 90 degree banjo enabled me to avoid having any exposed hose at the top of the bike. I simply used a round file to create a hole in the top if the headset for the banjo and the small front brake wire to feed through. Here's the end result, a lot neater than any others I've seen:

And here's an internal shot, showing how it all worked out:

Here you can also just see a replacement white earth wire that I fitted from the headlight to the mounting point of the throttle guide. This provides a more reliable earth than the headlight rim as is standard. The loom comes in on the right on my bike, as I simply couldn't find the room on the left!
Wednesday 3 June 2009
Get your motor running
I may not be able to ride out on the highway yet, but getting my motor running is a major milestone and somewhat of a relief. I've jumped the backlog of blog posts about cabling, wiring and plumbing in the brakes to report that the beast is alive.
I expected a whole heap of electrical or fuel/air niggles to resolve, but there were no such problems. Instead there was a mechanical problem that was entirely my fault. When I first tried to start it the resistance on the kick pedal felt wrong, and further inspection revealed that the flywheel was actually contacting something behind. I removed the flywheel and uncovered two potentially disastrous problems. Firstly, I used a spring washer on the stator bolts, and the top one that holds the cable support was slightly too prominent and had come into contact with the rear of the flywheel. Needless to say I replaced the washer with a wavy one. Secondly, and rather embarrassingly, there was a wavy washer lodged between two magnets on the flywheel:

I've no ideas where it came from, and I'm finding it hard to believe the washer was there when I fitted the flywheel as I would have checked it. Perhaps it was sitting loose in the mag housing or around the stator and got picked up after I fitted it?
Anyway, here's the video taken by my wife on a mobile phone in the late evening so it's a bit dull. It isn't the first start, as she'd have been standing there for over an hour; It's the second. I'm also pleased to report the noise didn't wake the baby.
Tuesday 5 May 2009
Front wheel not central?
My new outboard disc hub wasn't sitting central in my forks, it was about 9mm off. I don't have a photo because I was too annoyed to take one.
I couldn't work out why this might be, and a bit of googling only led me to one theory that I had a bent fork link. I can't possibly imagine a scenario where a fork link might get bent. If your fork link was exposed, in situ, to enough force to bend it then other things would bend or break first, surely?
With this in mind I dismantled it again and found the culprit. In the photo below you can see uneven wear on the face around the edge of the bush. The face has worn to the rear of the link (the top in this photo), but not at the front. This causes the link to sit at an angle when fitted to the forks.

The fix is simple. I filed the rest of the face in line with the wear so that the face was perpendicular to the bush/bolt that holds it in place. Then to compensate for the loss of width I doubled-up with another cup on this side, as not very clearly shown in this photo. You could also use a large penny washer under the cup.

While I'm on the topic of fitting the front hub, an important part of fitting your front hub assembly is using the right axle washers. They ensure that the hub sits exactly where its supposed to be but are more importantly a critical safety feature which will hold your wheel in place even if your main nut becomes a bit loose.

It's all back together now, and I'm pleased to say it sits perfectly in the middle!

Sunday 19 April 2009
More painting
Here's the rear hub in primer. I stripped it by hand with paint stripper so the finish isn't perfect under scrutiny.

The end result with the top coat of Silver / Metallic Grey looks great and matches the silver ScootRS rims really well. I used the same silver for the forks too.

It was also time to spray the top side of the frame and new cross member before I start doing the cables. A perfect match nor finish isn't required here as I'm going to be covering it in Waxoyl before finally fitting the legshields. Remember this ain't no show bike, this is going to be used!

Rather uninspiringly, the best (and it is rather good) match I could find was simply.....Beige.

New fork springs
I wasn't happy with the seemingly different performance of the old fork springs, so with the forks still in place on the scoot I dropped out the old ones and treated them to new uprated springs and rods as seen below.

These compliment the new link bolts, cups, bushes and buffers already fitted:

With the hub and the dampers in place, this is how its looking:


These compliment the new link bolts, cups, bushes and buffers already fitted:

With the hub and the dampers in place, this is how its looking:

Monday 13 April 2009
Taking shape
The engine looks great prior to refit with all its new shiny bits:


and now it was time to hang it back on the frame, along with the rebuilt forks complete with new bushes, buffers, cups and bolts...

The front hub is not bolted in yet, and it's interesting to see that the bike leaned to the left at the front (or the wheel to the right) as though the left spring was compressing more easily than the right spring. I'm going to investigate this a little further as I may have to replace the springs and rods with new ones to ensure I have a fork that's behaving properly.
Wednesday 8 April 2009
ScootRS tubeless rims
Tubeless rims reduce (or do they eliminate?) the risk of a blow-out. A compelling reason, so I bought some from ScootRS in Vietnam. They arrived in good time and well packaged, although I got stung for an extra ten quid by Fedex for some kind of unpaid customs taxes.
The rims are nicely made, and if you read about them on the web you'll learn that they're popular, but are difficult for the tyre-fitter. This proved true for mine, and they didn't escape fully unscathed. If you're a perfectionist or you've bought some chrome ones you probably won't be happy, as you either won't want to or won't be able to touch up the near-inevitable marks.
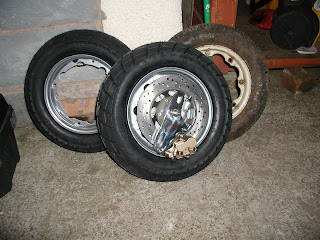
Regardless of this, I think they're great, and with Schwalbe Weathermans on they look great too:


These 100/90 tyres are 10mm wider than the crappy old Indian tyres, and the differences in width, shape and footprint are neatly demonstrated below by my son Bill, who gets excited about literally anything with wheels and so a stack of wheels was a dream come true.

And in a state of my own excitement I couldn't resist offering up my hydraulic disc and hub unit. More on that in a future post...
The rims are nicely made, and if you read about them on the web you'll learn that they're popular, but are difficult for the tyre-fitter. This proved true for mine, and they didn't escape fully unscathed. If you're a perfectionist or you've bought some chrome ones you probably won't be happy, as you either won't want to or won't be able to touch up the near-inevitable marks.
Regardless of this, I think they're great, and with Schwalbe Weathermans on they look great too:


These 100/90 tyres are 10mm wider than the crappy old Indian tyres, and the differences in width, shape and footprint are neatly demonstrated below by my son Bill, who gets excited about literally anything with wheels and so a stack of wheels was a dream come true.

And in a state of my own excitement I couldn't resist offering up my hydraulic disc and hub unit. More on that in a future post...

Rattle-can spraying
This is no show-vehicle, so I've opted to use an aerosol for the few parts that need it. I stripped the forks with Nitromors paint stripper and a wire brush. A few coats of high-build primer followed the next day by a sand and then a few coats of Silver/Metallic Grey did the job:

And the new cross member looks a lot better after just one coat of primer:


And the new cross member looks a lot better after just one coat of primer:

Tuesday 7 April 2009
A professional weld
I think I found the best way to find a good welder, short of personal recommendations. I chucked the Lammy in the back of the car and drove round the corner to the nearest backstreet car workshop and asked them. They sent me round the corner to another workshop, and a guy called Gary. It was 9am, and he said he'd have it finished by 2pm and it would cost only fifteen quid.
I'm pleased to report he did an excellent job:


and he did my damper mounts at the same time:

Now I can start rebuilding!
I'm pleased to report he did an excellent job:


and he did my damper mounts at the same time:

Now I can start rebuilding!
Saturday 4 April 2009
Welding on the new cross member
Removing the old cross member revealed a little more about the history of the frame. A crack can just be seen just beyond the end of one of the repair welds, and this shows that the frame suffered a collapse at some point which necessitated a full circumferential weld and strengthening plates to the upper and lower sides. You can see the crack arrowed in this image:

I bought a new cross member and borrowed a MIG welder to enable me to fit it in exactly the right place prior to taking it to the local welder who can do a better job finishing it than I.
To place it properly I used a scaffolder's spirit level (they are magnetic) placed on the engine mount to get the frame perfectly vertical. The lens of the camera makes everything look a bit skew here. It isn't - the engine mount is perpendicular to the frame:

I had to modify the cross member to cater for the existing stengthening plate and welds:

After careful measurement and multiple checks here it is welded on by the front edge only:

Then I ran a final panel placement mock-up to check that everything fitted. You can see here everything fits straight and as expected:


Now I just need to take it to a professional to finish it off for me.
Friday 27 March 2009
More on the frame
I mused yesterday that I might have two bikes welded together. This theory is based on the weld visible around the crossmembers and around the complete circumference of the main tube, and would also explain some anachronistic parts on the scoot.
There are of course other theories, and mulling it through overnight I now think the 'two bikes' theory is unlikely because of this:
1. If you're so bad at welding that you can't get the crossmembers on straight in either axis, how on earth would you manage to weld two frames together, dead straight?
2. There would be little incentive to do this kind of thing in India. As Dave Williams, author of The Indian Lambretta Guide says: "I cannot imagine a scenario in India (unlike here possibly) where two frames would need to be welded together....Remember that Lambys have no significant value in India so there would be no incentive..." This is a fair point.
3. It's more likely that the frame was showing signs of stress, perhaps even a fracture, that necessitated a stengthening plate top and bottom and a cirumferential weld.
Anyway, back to those crossmembers. Need to find a welder!
Thursday 26 March 2009
Frame problems
I knew things weren't quite straight on this scoot, but I thought this was limited to a sagging crossmember that might be bent back into place. Having removed the forks and now the legshields it has all become a little clearer:


They are off by a country mile, and I can't believe the legshields actually fitted. And they haven't bent, they've been welded like that:

There's also evidence that this might be two frames welded together. There are strengthening plates on the top and bottom of the tube (which apparently isn't that unusual), but there is a weld around the complete circumference of the main tube. Two bikes welded together would explain a lot - the early parts on a '77 scoot.
Whatever has happened, I know three things:
1. It's a mess, and I'll at least have to chop off the crossmembers and get new ones welded on properly. At the same time I'll get an expert welder's opinion on the main tube.
2. The frame is strong (and safe), as the bike has clearly been very heavily used over a long period on probably some shocking roads.
3. My key measurement from toolbox to steering cone is correct, and visually the main tube looks straight, but I'd still like to get this checked properly.
Subscribe to:
Posts (Atom)